July 12, 2015

Peach Pie


I made this peach pie with fresh Georgia peaches. I used my go-to all butter pie crust, and a star cookie cutter to make a decorative top that was festive for 4th of July weekend. My family thoroughly enjoyed this fresh peach pie with vanilla ice cream!

Preheat oven to 425 degrees.

Crust:
2 1/2 cups all-purpose flour
1 tsp. salt
2 tsp. sugar
2 sticks cold butter
3 tbsp. ice water
1 egg
Granulated sugar to sprinkle on top of pie

To make the crust, combine salt, sugar, and flour in a medium bowl. 

Use butter knives to cut in the two cold sticks of butter. Continue to cut and combine until a consistent crumbly mixture forms.

Add cold water to bring together dough.

Use hands to press dough together into two equal size discs.

Refrigerate the discs while making the filling.


Filling:
7 peaches
½ cup sugar
½ cup flour
½ tsp. vanilla extract
½ tsp. cinnamon
1/8 tsp. nutmeg
¼ tsp. salt

Peel 7 peaches and slice into 1/4" thick slices.

Combine sliced peaches, sugar, flour, vanilla, cinnamon, nutmeg, and salt in large bowl.

Roll out first pie crust disc. Press into bottom of 9" pie dish.

Dump filling into pie dish.

Roll out second pie disc. Use cookie cutter to make shapes for top of pie.

Whisk an egg and brush onto top of pie. Sprinkle with granulated sugar.

Bake for 20 minutes at 425 degrees then lower oven temperature to 375 degrees and bake for 30-40 additional minutes (mine took 35 additional minutes) until top is golden brown.

Enjoy!


August 9, 2014

Bridget's Chocolate Chip Cookies

With all of the fun recipes that I find on Pinterest and in my growing collection of baking books, I usually don't make the same dessert twice! However, I made these chocolate chip cookies for my mom's birthday party, and I have been dying to make them again. They are hands down the best chocolate chip cookies I have ever made! Chocolate chip cookies are so simple, yet tasty, but there are so many different recipes to make them. I love reading this Ultimate Guide to Chocolate Chip Cookies from Handle the Heat! It has pictures of chocolate chip cookies that have been made with different recipe modifications.


So what makes this recipe so great? It uses half brown sugar and half granulated sugar. The recipe also calls for half margarine and half butter. Not to mention the combination of semisweet and milk chocolate chips. Once I figured out how to chill the dough before baking and how long to bake the cookies, every batch was perfect! I have used this recipe to make cookies that are small and large, and depending on how big you make the cookies, the baking time will be slightly different. The best advice I have is to bake the cookies until they look almost, but not quite done, because as the cookies cool, they will continue to harden and you will have the perfect soft cookies. This is definitely going to be my go-to cookie recipe, and I can't wait to make these again to share with friends!

BRIDGET'S CHOCOLATE CHIP COOKIES
1/2 cup butter
1/2 cup margarine
1 cup brown sugar
1 cup granulated sugar
2 eggs
2 tsp. vanilla
1.5 tsp. baking soda
1.5 tsp. salt
4 cups flour
3/4 cup semisweet chocolate chips
3/4 cup milk chocolate chips

Preheat oven to 350 degrees.

Cream room temperature butter, margarine brown sugar, and granulated sugar.

Beat in eggs and vanilla.

Gradually add baking soda, salt, and flour.

Stir in chocolate chips.

Refrigerate the dough in two flat discs in plastic wrap for at least 30 minutes.

Roll the chilled dough into balls (about 1.5 tbsp. each). Place the dough about 2 in. apart on parchment lined cookie sheet. Lightly press on each dough ball to slightly flatten into rounded discs.

Bake on a parchment lined baking sheet for 12 minutes*

*For smaller cookies, 9 to 10 minutes is usually a good bake time, and for larger cookies, 12 minutes will do the trick. Keep your eye on the first batch. The cookies will stay light in color and you want to take them out before the tops of the cookies begin to crack a lot. After 5 minutes, you should be able to pick the cookies up off of the pan without them falling apart, but the insides will still be very soft.

Yields 36 large cookies.


Enjoy!
Bridget


June 28, 2014

Peanut Butter and Jelly Bars


I have been very busy since my last post! I moved out of my sophomore year dorm room, went to Costa Rica for a month, went to Florida for a week, and now I am home for the summer!

When my mom told me that she was volunteering at a flapjack fundraiser for her friends going on a mission trip to Thailand, I volunteered to make a dessert for the bake sale at the event.  I have never worked as a waitress, but I also volunteered to help serve pancakes for the fundraiser, and it was a blast! I would consider the morning a success because I didn't drop anything :)


For the bake sale, I made peanut butter and jelly dessert bars. They tasted just like a PB&J sandwich in a crumbly, gooey, dessert bar. The peanut butter layer is full of peanut butter and powdered sugar, and I could eat it plain by the spoonful. These were perfect for the bake sale, and any PB&J fan will be sure to love them!

Peanut Butter and Jelly Bars
For the crust:
1 1/2 cups all-purpose flour
1/4 cup sugar
1/4 tsp. salt
1/2 cup cold butter, cut into cubes
1 egg

For the Peanut Butter Filling:
1 cup butter, room temperature
1 cup creamy peanut butter
1 cup chunky peanut butter
1 3/4 cup powdered sugar
1/2 tsp. vanilla extract

For the Jelly Filling:
2 cups of jelly or preserves (I used strawberry preserves)

For the Crumb Topping:
3/4 cup flour
1/2 tsp. baking powder
1/4 tsp. baking soda
1/4 tsp. salt
1/4 tsp. cinnamon
1/3 cup brown sugar
2/3 cup rolled oats
6 tbsp. cold butter, cut into cubes

Directions
Preheat the oven to 375 degrees. Grease a 9x13 in. light-colored pan with baking spray.

Make the crust: Combine the flour, sugar, and salt, and put in food processor with butter. Process until crumbs form. Add the egg and process until combined. Take dough out of food processor. Use hands to finish incorporating flour and ingredients so that dough is smooth and mixed well. Press dough into greased pan. Refrigerate for 30 minutes.

Put foil over the dough and place pie weights (or beans or another pan) on top of foil. Bake for 15 minutes. Remove pie weights and foil and bake for 10 more minutes. It is important to keep an eye on the crust because if left in the oven too long, it will start to crack! Mine had a few cracks, but it still turned out okay! Allow crust to cool.

Reduce oven temperature to 325 degrees.

Make the Peanut Butter Filling: Beat the butter and peanut butter until smooth. Add the powdered sugar and vanilla. Spread the peanut butter filling over the cooled crust. Put the pan in the refrigerator while you make the crumb topping.

Make the crumb topping: Use a fork to mix flour, baking powder, baking soda, salt, cinnamon, and brown sugar together. Add butter and incorporate until even crumbs form (you can use your hands, a hand mixer, a mixer with a paddle attachment, or two knives to help with this step).

Spread the jelly or preserves on top of the peanut butter filling layer. Sprinkle the crumb topping on top. Use your hands to press the crumb topping down gently before baking for 20 minutes.

Allow the bars to cool completely before cutting.

Adapted from the Brown Eyed Baker

Enjoy!
Bridget


April 24, 2014

Oreo Rice Krispie Treats

Every year my Tri Delta chapter holds a philanthropy softball tournament for the Greek community to raise money for St. Jude Children's Research Hospital. If you haven't heard the exciting news, Tri Delta has raised $15 million in 3.5 years for the kids at St. Jude. Tri Delta also funded a special teen room at St. Jude for patients, and I couldn't think of a better organization for my sorority to support.

This year, I signed up to bring a dessert to the softball tournament because all of the softball participants deserve a sweet treat after playing their game! These Oreo Rice Krispie Treats were such a hit! And they were super simple to make - even in a dorm room kitchen :) Accompanied with these photos that were taken on my iPhone before I ran out the door for an 8:30 class this morning, this is college dorm room blogging at its finest!


OREO RICE KRISPIE TREATS
6 cups Rice Krispie cereal
10 ounce bag mini marshmallows
16 oreos
3 tbsp. butter
1 1/2 cups melted white chocolate chips

Melt the butter in a medium saucepan over low-medium heat. Once the butter is melted, add all of the marshmallows and continuously stir with a rubber spatula until smooth.

Crush 10 of the Oreos and combine with the Rice Krispies in a large bowl.

Pour the melted marshmallows into the Rice Krispies and stir until combined. Pour the Rice Krispies into a 9x13 pan that has been greased or sprayed with cooking spray. Press the Rice Krispies into the pan.

Melt the white chocolate chips in the microwave. Pour over the Rice Krispies.

Crush the remaining 6 Oreos and sprinkle on top of the warm melted chocolate.

Gently press the Oreo crumbs into the chocolate.

Allow the Rice Krispies to cool before cutting into squares and serving.

Enjoy!

August 4, 2013

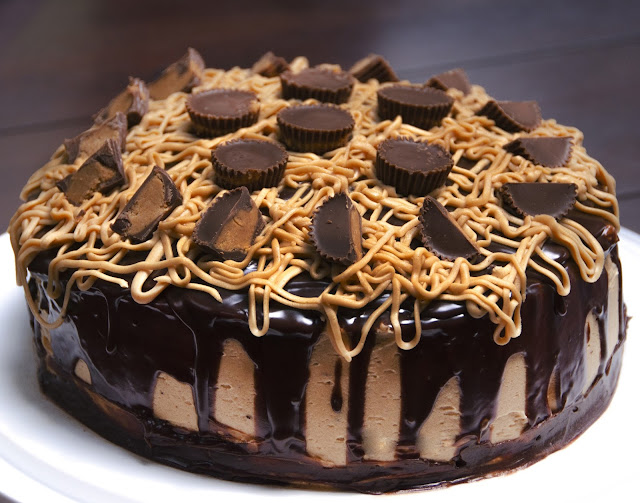
Reese's Peanut Butter Chocolate Cake

Summer is truly escaping, and one week from today, I will be moving back into my dorm! Since I have been busy working as a nanny, volunteering at the hospital, and spending time with friends and family, I have had little time to bake and blog! However, I had to make a decked out dessert for my mom's birthday. This Reese's peanut butter chocolate cake certainly fit the bill. I had added this cake to my Pinterest board after seeing it on another blog, and I immediately knew this dessert was right up my mom's alley. The chocolate cake is moist, the frosting has the perfect sweet peanut butter flavor, and the smooth chocolate peanut butter ganache makes the top of the cake pretty. And who doesn't love pieces of Reese's peanut butter cups in their cake? This cake is fit for a queen (or any super mom), tastes even better when refrigerated, and is perfect for any chocolate peanut butter lover.

REESE'S PEANUT BUTTER CHOCOLATE CAKE
1 cup boiling water
2 cups sugar
1 3/4 cup all purpose flour
3/4 cup cocoa powder
2 tsp. baking soda
1 tsp. baking powder
1 tsp. salt
2 eggs
1 cup milk
1/2 cup oil
1 tsp. vanilla extract
1 12-ounce bag mini Reese's peanut butter cups

PEANUT BUTTER FROSTING
1 cup butter
2 cups peanut butter
4 cups powdered sugar
1/3 cup of milk (more or less to achieve desired consistency)

CHOCOLATE PEANUT BUTTER GANACHE
1 cup semi-sweet chocolate chips
4 tbsp. peanut butter
1 cup heavy cream
4 tbsp. light corn syrup
1 tsp. vanilla extract

Preheat oven to 350 degrees.

To make the chocolate cake: Combine sugar, flour, cocoa powder, baking soda, baking powder, and salt. Add the eggs, milk, oil, and vanilla and beat until combined. Add one cup boiling water. The cake batter will be thinner than most batters and this is expected. Pour batter into 3 8-inch pans lined with wax paper. I tried to make the cakes by just spraying the pans with baking spray, and they stuck to the pan and broke when I tried to remove them, so use wax paper! Bake 18-22 minutes until inserted toothpick comes out clean.

To make the peanut butter frosting: Beat butter and peanut butter. Gradually add powdered sugar and milk until desired consistency is achieved.

To make the chocolate peanut butter ganache: Heat the heavy cream over medium heat and remove from stove once it just starts to boil. Pour heavy cream over chocolate chips and peanut butter. Let sit for two minutes, then slowly stir until fully mixed. Stir in vanilla and corn syrup and allow to cool. Ganache will thicken upon cooling.

To assemble, place one layer of cake on cake stand. Set aside 12 mini Reese's cups for top of cake. Chop the rest of the Reese's cups into quarters. Frost top of first layer with frosting. Add half of the chopped Reese's cups. Place the next layer of cake on top. Again, frost the cake and add remaining chopped Reese's. Place the final layer of cake. Frost the entire cake. Pour ganache on top of cake. Optional: drizzle some of the frosting on top of the ganache. Place 12 remaining Reese's on top of cake.

Recipe from Bird on a Cake

Enjoy!
Bridget

July 7, 2013

Mini Red Velvet Cupcakes with Orange Cream Cheese Frosting

After a few crazy days of Fourth of July festivities, I am ready to get back into my normal summer routine. Don't get me wrong, the Fourth of July is my favorite holiday (it even tops Christmas), and I thoroughly enjoyed 4 days of picnics, fireworks, and fun time with family and friends. However, it seems like the holiday gets drawn out when it falls during the work week because my family had a full agenda for the entire long weekend.

When attending a picnic or a potluck, deciding what to bring is usually a no-brainer when I am home...dessert! I never turn down the opportunity to try a new  recipe that I have been eyeing on Pinterest. These cupcakes were a cake/frosting/garnish combination that I thought up myself, and after bringing them to two different parties, I can say they were a hit! The frosting does not have an overwhelming orange flavor, but it does add a little extra tang to the cream cheese frosting. The candied blueberries on top were easy to make, and they help make these cupcakes the star of any dessert table!

RED VELVET CUPCAKES
1 1/3 cups all-purpose flour
3 tbsp. cocoa powder
1/2 tsp. baking soda
Pinch of salt
3/4 cup butter
1 cup + 2 tbsp. sugar
2 eggs
1/2 tsp. red gel food coloring
2 tsp. vanilla extract
1/2 cup buttermilk

Preheat oven to 350 degrees F.

In a small bowl, mix flour, cocoa powder, baking soda, and salt.

In a separate bowl, cream the butter and sugar. Add eggs, vanilla, and red gel food coloring. Alternate adding the dry ingredients and buttermilk to the rest of the ingredients.

Pour batter into prepared mini muffin tins.

Bake for 12 minutes. Allow to cool for 3-4 minutes before removing from pan.

Recipe from Design Bake Run

ORANGE CREAM CHEESE FROSTING
8 tbsp. butter
8 ounces cream cheese
2 tbsp. orange juice
4 1/2 cups powdered sugar

Beat cream cheese and butter together. Gradually add orange juice and powdered sugar until desired consistency is achieved.

CANDIED BLUEBERRIES
Egg whites
Blueberries

Lightly brush the clean and dry blueberries with egg whites. Roll in granulated sugar. Allow to dry before garnishing cupcakes.

Yields 48 mini cupcakes

Enjoy!
Bridget